
.png)
Build blog on our demo Pop Top van. This build will highlight key upgrades and extras possible on a low roof Sprinter. Many of the things we will do in this build are as well ideal for a high roof Sprinter. This van will still be in the weekender style and ideal for a family of 4. This will be my personal van for at least year so going to build this one how I would build a weekender with no restrictions. It will still be very simple (but not cheap) as I don't live in the van, I camp in it with the family, take it to the beach and mountains, and use it to transport large items.
Here is what we are starting with a Crew 4WD Sprinter. We start with a crew van as they already have 80% of an interior, crash tested seating, heating duct for passengers, rear windows, flooring...saving thousands of dollars in the build...in a high roof as much as 8k in build costs if you use the stock interior.


We get it...its always nice to add some eye candy on you van. Its important to build your van in steps, in this case we need to modify the wheel wells to allow for larger tires. Here we use the Van Compass Kit to open up front and back wheel wells. We will be using 275's, but 265's are a great alternative as they are more practical for "real" off road use or heavy snow use as you gain more clearance. You can also use 265's on stock wheels and that tire fits in spare tire slot. Its super tight fit either way and fender modification is a must at least in the front wheel well.
example of what needs to be cut out.

Complete, gain 1.5" of clearance...ready for larger tires.

We also added some Owl Stuff. We are going to relocate the tire to make room for a water tank and the ladder will enable us to climb to the roof rack that will be put on this spring on the Pop Top. The B2 carrier on the right will have a box and bike carrier.

We had to remove the panels to install these items, when doing so we sound deadened and insulated the rear doors...when you have your van apart...do electrical, sound deadening, insulation. Its important to do things in proper order. We use top quality product only. Dynamat Extreme and 3M Thinsulate...yes there is a difference when you use quality materials. We also use a lot more than the average person, this makes our builds much quieter than most vans. We typically use 20-30% more material than the typical builder.


Example of Slider door...stock, sound deadening, and then insulation steps. Notice the difference from stock. (first pic). We as well stuff the areas you don't see with insulation as much as possible. We see a lot of customs whom insulation there vans but don't do the doors...its a HUGE difference if you do the doors...otherwise you only get about 50% of the benefit. It typically takes us about 20-25 hours do do a van. (not including the flooring). On a high roof about 150 square feet of sound deadener and insulation is typical on a high roof.


Its always fun to get eye candy on the van...and usually one of the first things owners do...I get it totally...here we have the new wheels on the van. Since I don't really do any hardcore off-roading I went with 275's...largest tire before you screw up the computer...265's are a better choice if you are in the snow and use cables/chains or doing any real off-roading...its wise to have that clearance. You do need however to modify your fenders to get them to fit.


and the spare of course

Like we tell everyone...electrical first when you take the van apart...this build no exception, we added auxillary AGM batteries in the hood to keep the inside clean and clutter free. AGM because they handle the cold much better than lithium. Not that we don't like lithium, but they are very expensive, cant be charged when cold (for the most part), and in this build these batteries are more than enough power with solar. You have to put one battery on each side of the engine to get them to fit as well as the ECU module needs to be relocated. This van has LED lights...so that make this a very tight fit. We run the fuse panel under passenger seat for easy of access as well as we put the heater under the passenger seat as well. Nice and tidy...and hidden. This is a bit of work...to make it clean. This is also set up for solar later as well as you can see the isolator as well is accessed easily.


Got the heater installed as well...a lot of stuff will be here soon...adding an amplifier as well as another circuit board an relays for the pop top will go here later. We are known to keep things hidden and looking "stock" this van will be no different. There are no large cabinets in the main cabin taking up space for batteries or electronics keeping the van clear for gear.

Since you have to take the front floor out to run wires properly...sound deadener and insulation was was put in this front area to make it just a bit quieter. Its not a "must" but since we had it open this was added on. Its a higher end build so it makes sense and the entire rear floor will be done as well. On the floor we use DynaMat Extreme and closed cell foam (1/8)...if you go to thick you have issues with everything fitting. In this van we don't have a manual e brake...makes everything a lot cleaner.


As we always do...taking the van apart is the first thing...here we finally remove all the panels and headliner from the rear so we can run wiring, sound deaden, insulate, relocate the satellite antenna as it will be covered/cut out by the pop top going in. There is a lot of planning involved with specific steps to reduce the labor involved in a build. We don't want to go back and forth doubling the work. When the van is apart you do all the stuff that is needed. (solar, electrical, fan, lights, sound deadening, insulation, roof rails...every build is a bit different). Can tell you how many times we have had to take the van back apart to add a fan, solar, L track for storage bags, or a light...its a lot of labor to do this...like starting a build from scratch as often the entire van has to come apart again. We strongly recommend biting the bullet on the budget and do it right the first time or it could cost you 2x as much to do it later, not to mention your van is not available while it gets worked on again.
We already did the rear doors and slider...now we remove the headliner and rear panels so we can get to the real work in the van. The floor as well will be coming out very soon.

At this stage you do all your wiring for your outlets. These will all be DC outlets as well as we are running the solar line to the battery.

Now we have cleaned up the wiring...ran everything in loom to tidy it all up.

and appropriate electrical connections at the aux fuse panel that is connected to the aux house battery set up under the hood.

Sound deadening the van with Dynamat Extreme...this is the superior product in the market place for sound deadening. They use this stuff in million dollar car builds. No asphalt mix in this product. We use this now in all of our builds. You can see there is no lack of coverage. In this build we are doing the floor as well. Our standard package is all doors, walls, and roof. There is going to be half of the roof cut out of this van so we are not going to cover this area. In the front we still have to relocate the satellite antenna so this isn't covered yet, where it is currently is going to be cut out for the Pop Top. Full windows are going as well so these areas are not covered. This is a huge amount of material...especially the floor.


Insulating the floor now with a layer of closed cell foam from 2nd skin. We use 1/8 as anything thicker warps the stock floor with all the floor cups. We are also covering the floor with interwoven vinyl that is flocked...so plenty of insulation.

Floor is now put back in

Now the interwoven vinyl that had been pre-cut to fit goes in. This will be glued down but you can also just lay it down and the seat and cargo pucks almost are enough to keep in in place. We use 3M 94 glue to lay it down. This stuff is great for floors but really expensive.

Internet magic...the floor is now done. This is an "easy" but very time consuming job with really expensive materials...the flooring material and glue almost 1k...insulation and sound deadening for the floor another $800...and a lot of time. The stock floor was used. A good DIY project however if you want to tackle it on your own van. Give yourself a few days to tackle it if you have a van with stuff in it. Its ideal you don't have your walls in...you can make a real mess with all the glue...and it isn't easy to remove at all. This however makes the van VERY quiet, and gives it a very high end feel. We like interweave way over rubber coin flooring. Its a superior product unless you plan on loading motobikes and other heavy gear that can really cut into flooring.


next...we will be insulating the walls and installing the DC 12v outlets and USB ports to button up the bottom half of this van and windows going in all around. (vented and screened) T and we put in the adjustable bed wall mounting L track. lOTS more work to get this van about 40% to completion.
Beginning of some simple audio upgrades. We already have pre-wired for our audio upgrade when we will install an amplifier and rear speakers. Have as well upgraded the front speakers from oem ones. Notice the difference in the magnets in particular. You can't run a lot of power or a heavy high end speaker in this door mount, but we don't plan to. An adapter ring is used to put this larger speaker in place of the stock ones. Its also super important to sound deaden the front doors and insulate them...this make almost more of a difference than the speakers. Its a big difference if done properly in sound quality.


Sound deadening, notice how we do the entire door, not just a patch. Compare the stock door to what we do. Insulation as well will be added into the door and door panel.


Satellite antenna relocated to make room for the pop top. Small details like this count in a build, but can really be time consuming to make it turn out right.


We added two windows and replace two (more on that later) as well as installed support braces and L track wall kit from Adventure wagon for a MOAB bed. I decided to use a V2 Kit (this was cut down to fit and painted black to blend in the van a bit more) so that the bed can be lower than on a V1 kit. V1 kit is from below window to top of window, V2 kit is from floor to top of window. For this particular van I wanted to be able to have the bed low enough so my head would not kit the headliner when sitting, and to be adjustable for a higher height. This however is a very expensive bed compared to other builds I have done in low roof vans. Like 2 x as much more...$$$. Its not really needed, but in this van I have decided to do a lot of the higher end upgrades for this build and I am not really holding back on $ with this build so why not? It adds utility that could be nice if you wanted to put bikes or another row of seats and have the bed above the seats. You an also see here the low voltage outlet wiring, insulation, and carpeting of the wheel wells to give the rear a finished look once we put panels back in place.


AMA Windows - vented and screened OEM look. I prefer in my vans to have windows; better visibility for driving and when I am camping I prefer seeing the views. I use window covers for privacy or added insulation.


Decided to as well upgrade the audio, this is a bit of work to do with the 7" Factory MBUX. Because audio systems are computers as well they integrate into the van systems are not ideal to replace and they are vastly improved over the older systems. Reprogramming is needed to add ability for rear speakers as well as adding connection points in the factory harness. We neatly fit everything hidden, the very compact class d five channel amplifier here will power 4 speakers and a down firing sub to go under the bench seat. This won't win any SPL competitions but is a significant upgrade from stock which is horrible. A simple front speaker upgrade and sound deadening and insulation on the front doors is as well a first step in upgrading the sound system.


Rear panels in interweave and rear speakers installed. Few more things to finish out this area. You don't need to replace these panels, however in this build taking a few extra steps as its a higher end weekender.


Installed front swivels as well. The alpine designs swivels are very low profile and don't make any noise however they are not DOT approved but are very well built. If you are under 5" 7" this really is the only option to seat comfortably. They are not low profile if you have power seats as they require a spacer.


Front table area using our Lagun mount

Rear Bed photos- this bed is fully adjustable from wheel well to headliner for height. Its an Adventure Wagon MOAB bed with V2 wall kit that has been painted. These are our custom cushions made to fit each panel individually.


subwoofer under bench seat

L track added at belt line above lower panels


Rear Lighting under bed

Adding rear speakers requires soldering pins and running wires and activating the fader control. This requires dealer to reprogram the ECU. A bit of of work on a crew or cargo van.


Rear Owl ladder, heavy duty box, and bike racks. We have a ladder as in the future we are planning on putting an Aluminess rack on the Colorado Campervan Pop Top...going on soon! ou are looking at 5k worth of rear hardware on these doors. Its super trick, but it isn't cheap.

Finally got the van back from Colorado Campervan with our top! Its been a long wait to get this done...booked it 6 months ago! But its back and ready to get to the back half of this build! Its super dirty was trailered through a blizzard back to Cali. Really excited to continue this amaing build. We got some big plans for this van.

Aluminess Steps are added to get into the an easier. This is really going to be needed with the lift kit being added to the van soon.

Pop Top Magic with an awning as well.


This van we are putting in an outside water shower that can be used cold or with a heater. First step is to put the tank in. We choose to use a spare tire tank...super easy to put in and is the reason we put the tire out the back...to free up this area. The other area to put a water tank is next to the gas tank, but we are reserving that spot for a aux fuel tank! Putting in a water tank is a bit more work than just strapping in a tank...you need to think about venting as well as power. We took care of power location when we did the interior, for venting we ran a line up into the interior wall then back out. This is the right way to do this so you don't loose any water our your vent. Some cutting is required to get it to fit. Thinking about as well offering a how to for a water tank with a parts list for purchase. Its a bit overwhelming to figure out all the bits to put a water tank in. Its easy to do this this location but a few tricks help to make it way easier. Parts are just under $1000 (cold water only) or so and its a very full day to put one it. Most vans have power in back from a 12v outlet that can be used...we however of course ran a 12v line with a heavier gauge wire to more properly power the pump.
Vent tube example; we had to take the interior panel out and insulation to drill a huge hole to get the vent tube up and back from below as well as run power line to the pump.

Water tank mocked up in the spare tire location.


Been side tracked completing customer builds but more work has been done on this build. Last week a custom rack was per-fitted by Aluminess and recently just got a Recon bike rack. Its a big challenge figuring out how to carry all the stuff for a family in an efficient way. The bike rack is no different. I decided to go away from a swing away hitch to a different bike rack to reduce foot print but did not really know if it would work with a huge box on the back of the van. It ended up working out really well.


Super excited to finally get the Aluminess Roof Rack made for a Colorado Campervan Pop top. We worked with Aluminess so the can offer this in the future for CCV tops. Wired up lights and installed the new Owl bumper brush guard with a few lights as well. The rack holds 180 watts of solar, works with a Maxx Air Fan, and has front and soon to be rear lights as well. The CCV has a limited load to a few hundred pounds for lifting, but its very hand to load up extra gear if needed or a place to take some photos and of course just looks cool.


A two seater gives flexibly for the interior to fit a removable sink and a fridge, still having the dinette area and modular set up for any configuration. This is a seat custom modified from a OEM three seater to a two seater. Added as well rear upper removable storage using Campovans bags. There is always a challenge with storage in any van, we addressed this with rear storage box, upper storage bags, and lower storage under rear bed...all totally removable. Even added some outside lighting for back and side of van.


This van is now being offered up for sale. I built this with the intention of not selling this build for some time, but have a few more demo van projects in the next 9 months that I just committed to so its open to move to a very lucky family who wants one of the best weekender built vans out there.
Summary of the mods on this van
Insulation and sound deadening of entire van using Dyna Matt Extreme, 3M Thinsulate, and closed cell foam from 2nd Skin Audio on the floors. Great care was taken to get full coverage in ALL areas, doors, floor, roof, walls, including the nooks and cranny areas to maximize the result.

Electrical was carefully done. Batteries installed in the hood to keep interior clean. AGM batteries used so that batteries can function in extreme heat and cold conditions along with 180w of solar power using Zamp panels and controller to keep things charged. Both the Alternator and solar charge the batteries with controllers for both to keep things properly charged. System is totally isolated from starter battery.


Espar D2 Heater was added as well as audio upgraded with Kenwood 5 channel amplifier, rear speakers, 8 inch subwoofer that fits under back seats that can be moved around or taken out easily. Fuse panels are located under passenger seat so you can access them very easily all of this carefully placed so maintenance or modifications if needed can easily be done. All hidden from view of course and not taking up any floor space. Wiring kept neat and organized and dedicated wires ran for each outlet (+/-) to avoid ground faults or to troubleshoot easily any outlet or circuit. No hidden wires connections to fool with. Details like this count, especially if servicing or mods are wanted in the future. Even the pop top panel is located under the front seat out of the way. This is how we keep the interior looking totally stock, no boxes, no cabinets taking up valuable storage space and keeping kids hands away from electronics. Cigarette lighter outlets and USB outlets are everywhere in this van so you can charge phones, tablets, blue tooth devices, and computer using small plug in inverter.


Finished floor with Interwoven vinyl (not the cheap brand/stuff). This not only makes clean up easier, it looks great, not slippery when wet, provides extra sound deadening and insulation as well.
LED Lighting as well was installed so that you have lights running off aux power. We also have lights under the bed and even outside for the back door and passenger side of van, and of course not to mention the front driving lights...all six of them. A bit over kill, but looks good.


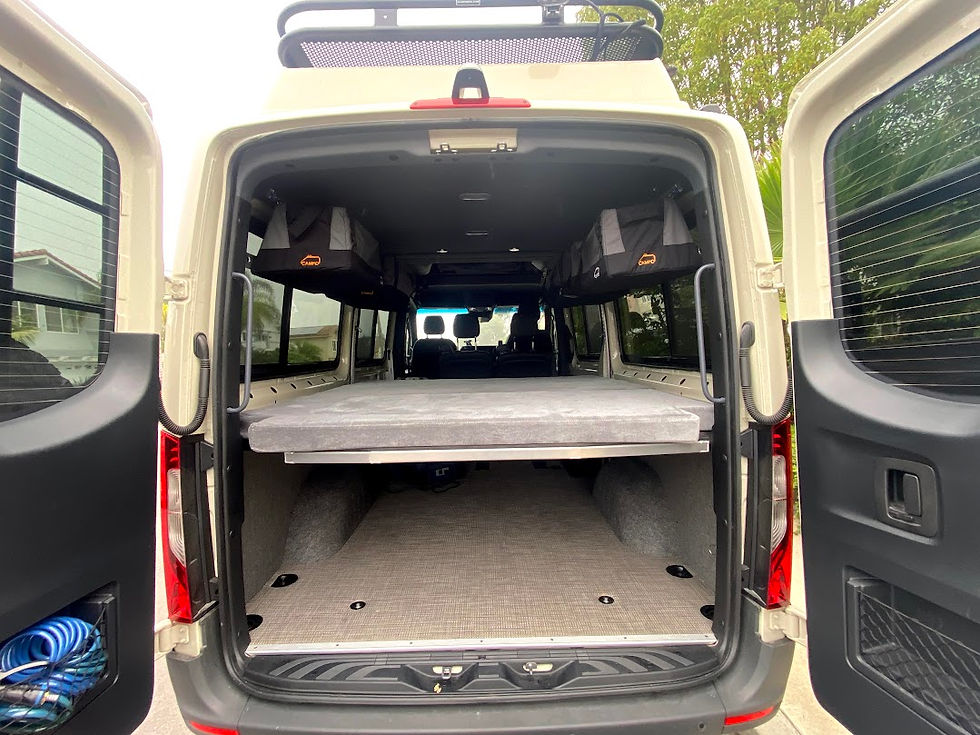
Huge problem with any van is storage, especially with a family of 4+ so we added rear L track to hang specifically Campo semi rigid storage bags. These easily clip on/off really maximizing space in the van. The idea of a smart build is to have everything in its space so you DON'T have to move your gear to go to sleep, eat inside, or even enable you to pack more efficiently or unload faster. These are removable in seconds and you can sleep under them as well, your head in the rear is not below the bags.


Of course we added a fan, that is a must have on a van and you need vented/screened windows. We added 4 full size windows with vents/screens from AMA. These fully open up with or w/o the screen. Give superior visibility and if you want privacy just use a magnetic insulated widow cover/shade and you have everything private. We love windows...since we camp outdoors i prefer a view rather than a small pill style window. Driving the van as well is way easier with windows all the way around. They are great if you have dogs...they can stick their head out the window and the screens if damaged can be repair or replaced much easier than CRL. By having 4 vented windows you often times don't need to use the fan, you can get a cross breeze flowing with no noise. I strongly prefer more vents than none...think of how it would be in your house if you only had half the windows opening up?


Major suspension upgrade with a Agile RIP Kit and we extended the range of the van adding an aluminum 20 gallon gas tank giving this van over 42 gallons of fuel. No more range anxiety. This isn't just bolting on some shocks, this is a tuned suspension that even changes out the rear leaf springs.


For outside water a 20 gallon tank was added. Hot water can easily be added on by using a Joolca hot water system. We designed it for plug and play if hot water is needed. The interior sink as its own water tanks (clean/gray) as its a self standing sink that can be easily removed.
Pop Top- this is what separates this van from all others. Read about top comparisons in our blog page. CCV top is insulated, has a fan, huge inside, insanely big windows, and you can actually sit up in it unlike other tops, this area above you actually like to be in, its not a cave its a cavern. We as well had Aluminess design the first rack for this top with a touring bar, all aluminum. We place the special sized solar panels so you still have a bit of rack to use. Mesh allow you to walk on it as well. You can load about 100-150 lbs on the rack, if you are not lifting the top up to 300. (motors only handle a light load to lift) It of course makes the van super cool. There is even USB outlets and lighting in the Pop Top and of course a mattress. Both beds on top and bottom can sleep full size adults COMFORTABLY over six feet and not feel like you are trapped.


Storage again being a priority a rear Owl Tire/Ladder and a B2/Box combo was put on the rear doors. All aluminum of course. This allowed us to put the aux gas tank below, added a ton of storage to the rear, and with this system you can even have bike mounts on the B2/box if you wanted. We opted to go with a set up to allow use of RECON bike rack when wanted. You can actually still open up the doors with this bike rack.
System with 1 UP trays (not on van currently, but shows option to carry two bikes on this set up
System using Recon Bike Rack (we have a family so we have 4 bikes).
For the interior its all modular. We have a dinette area up front that sets up very quickly. Swivels are by Alpine Designs (lowest profile, no play) Lagun Set up, allows 4 to eat with the two seater. We set up this van with a two seater and table. You can put a 3 seater in the van to seat 5. We use the two seater OEM comfort seat so that we have room for a sink (removable in seconds) and a fridge. You can have this with a three seater, but has to go under the bed. In the back we have a MOAB bed with a V2 wall kit allowing the bed height to be fully adjustable with just a few bolts. Is super lightweight and removes very quickly. A second seat row could as well be added by changing out the rear floor tracks if needed. We use this design again so that no gear has to be moved to eat and you still get great views out the side and back of the van. Everything is removable allowing the fridge and even the sink to be used outside. We find there is enough room behind seat and between bed to dress as well as room up front especially if swivels are turned around. Everything in an interior is a compromise, especially in a 144". There is no perfect set up, but we find this one superior compared to others for families in particular. You could as well just install a "one seat" captains chair that can bolt right into the stock seat mounts if you only had 3 on a trip giving a bit more room. (we sell these for about $1600.


two seater moved to drivers side
Photo examples if 3 seater is used (area on side is not available with this set up)


We added additional storage with removable Campo bags. These semi-rigid bags are great to keep more gear organized and remove in seconds. We did a custom system mount themand keep them away from the windows.

"smart build is to have everything in its space so you DON'T have to move your gear to go to sleep, eat inside, or even enable you to pack more efficiently or unload faster" --- well said